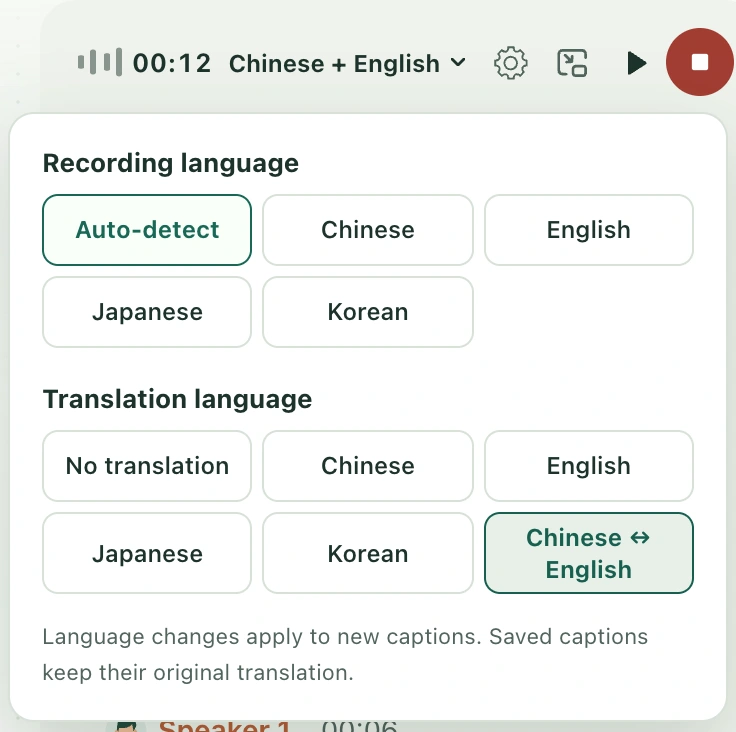
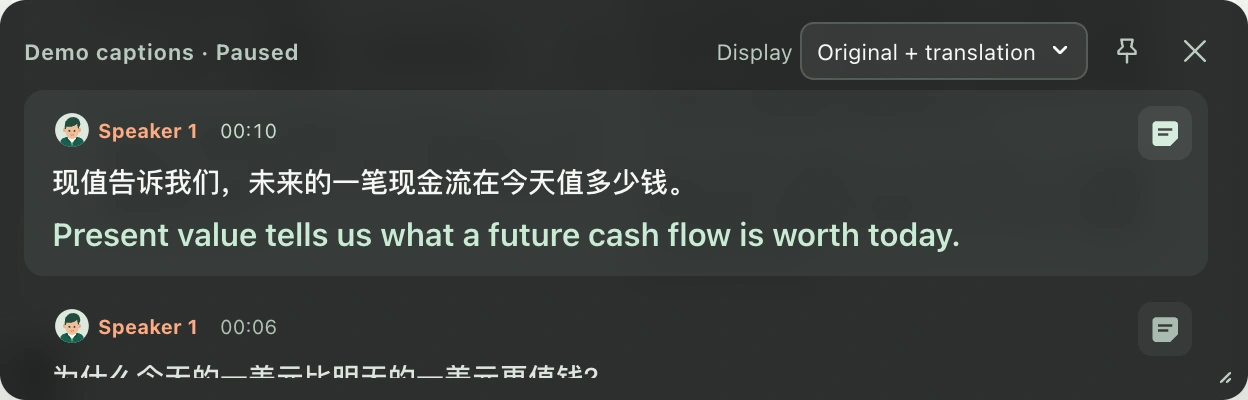
Live translation captions turn speech received by your microphone into text with a corresponding translation. Read the courseware alongside the teacher’s words, or scroll up to revisit earlier captions. Choose recording and translation languages separately: recording offers automatic detection or Chinese, English, Japanese, and Korean; translation offers no translation or a target language. Automatic detection also retains Chinese–English two-way translation. The same source and target gives original-only transcription. Follow the current controls’ availability.
Watch the walkthrough
This video is currently unavailable. Open video in a new window
Before you begin
Sign in to your own account, open the class you want to record, and stay connected to the internet. Obtain consent from the teacher and other participants, and position your microphone where it can clearly pick up the explanation. On first use, allow microphone access when the browser asks. You may add courseware beforehand, but you can also begin recording without uploading a file.
From recording to reading captions
- At the top of Lesson activity on the right, select the microphone control labelled Start recording. Read the recording confirmation, confirm that you have obtained consent, and allow microphone access when prompted by your browser.
- Wait until recording is ready. Open Class captions for the original and available translation. Select the language control at the top to choose recording source and translation target separately. Changes apply at a connection boundary; a confirmation after reconnection shows they have taken effect. These settings are separate from caption display.
- To focus on your courseware, select Open floating captions. In its language menu, choose Original + translation, Original only, or Translation only. This changes what you read in the window.
- Drag the top of the floating window to move it, or drag its lower-right corner to resize it. Use Lock caption window position to keep it in place. Closing the floating window leaves captions available in the right-hand panel.
- Select Pause recording for a break and Resume recording to continue. After reading earlier captions, open the three-dot menu above captions and choose Follow latest captions. Scrolling to the latest content also resumes following when no text is selected. Select End recording when class finishes.
How your recording and captions are kept
Captions and audio from a real class are saved to that class. After ending recording, wait for the final content to finish processing. If the page shows content waiting for a connection or another save warning, keep it open and follow the instructions. Later, reopen this class from your own records to view the saved captions and recording. The demo class uses preset content to help you learn the interface.
If captions are missing or a translation looks wrong
First check whether the recording status and timer are changing, then check browser microphone permissions, your system input device, and the network. Use the microphone option in Lesson settings to confirm the device. If captions report an interruption, follow the recovery instructions and check what has saved; recording and caption status must be checked separately. Add specialist terms through Course terminology. New terms take effect when recording next starts or resumes. Check important numbers, names, and conclusions against the original speech.